
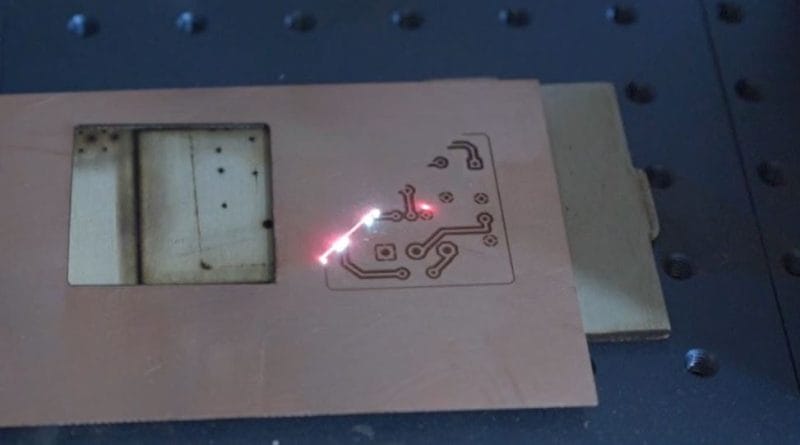
Making PCBs with a Fiber Laser (video)
I recently picked up a 20W fiber laser machine and immediately set about figuring out how to use it for pedal making purposes. Obviously it’s great for etching powdercoat off of enclosures, but it can also engrave into metal. And I also discovered that it can etch, “drill”, and cut out PCB from copper clad blanks. I’m still working out the final details for speeds, power, and frequency, but I’m getting very close. When it’s all done, I will publish the settings so others can use with their machines.
It’s also possible to do double-sided boards, but the process is a bit more complicated as you need to sort out some kind of very accurate alignment jig setup. So for now, just single-sided boards.
As always, some links on this page are affiliate links.
I’m also working on engraving the fiberglass side to include the markings from what is usually the silkscreen layer (part numbers, values, footprints, logos, etc). More to come!
Safety First When Making PCBs
You need some good ventilation for this, as making pcbs with a fiber laser involves incinerating fiberglass and there is a bit of ash/dust and some pretty heinous aromas. I recommend at least some kind of simple fume extractor with a physical filter media to capture the fiberglass and copper bits. I used this one in the video: https://amzn.to/4hvgkEG and it worked a LOT better than I was expecting. I also recommend wearing some kind of facemask to filter out what doesn’t get pulled into the filter.
Gweike G20 Pro Fiber Laser
For this project, I used a Gweike G20 Pro fiber laser. It’s got a 150mm x 150mm working area, which is large enough for most guitar pedal projects, including just about any PCB you’d reasonably want to make. It was easy to set up and get running. Seems to be great so far.
I also used 1mm PCB blanks for this video and test. 1.5mm is the most common thickness and that also works, but 1mm cuts down on laser time by about 30%.